Free online MP4 trimmer
Free online MP4 trimmer to trim videos quickly and easily. Use our Video trimmer to cut and trim video online for TikTok, Reels, and YouTube Shorts.
Please ensure you own the rights to the video you upload.
Free Online MP4 trimmer
Or drag and drop your video here
Supported formats: MP4, WebM, MOV, AVI
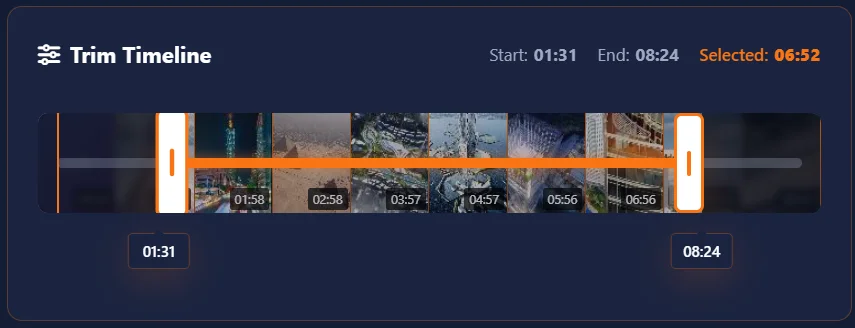
Trim Timeline
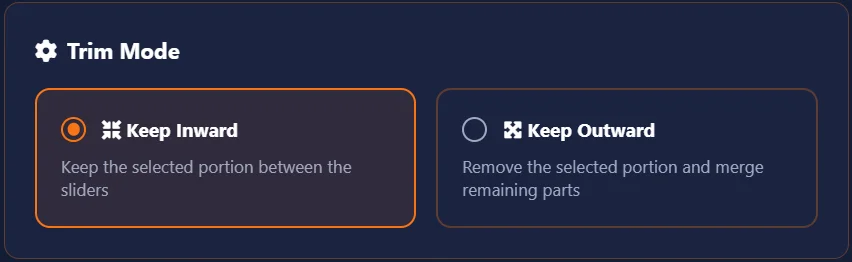
Trim Mode
Upload a video to start editing
More Video Tools
Explore our complete set of modern video editing tools to enhance your content creation workflow
Shorts Creator
Optimize your long videos into shorts with automatic aspect ratio adjustment and multiple styling options.
Try NowVideo Merger
Combine multiple video clips into a single seamless video with smooth transitions and custom ordering.
Try NowVideo Splitter
Split/Divide long videos into smaller segments at precise timestamps for easy sharing and editing.
Try NowAudio Extractor
Extract audio tracks from your videos and save them as MP3 files for creating podcasts, music clips, or sound effects.
Try NowFrame Extractor
Capture still images from your videos to create YouTube video thumbnails, social media posts, or storyboards.
Try NowInterval Countdown Editor
Add multiple intervals in your videos with different styles to create dynamic, engaging content.
Try NowMulti-Reel Builder
Combine 3 videos in a single frame and Create captivating multi-video reels for social media with text options.
Try NowThis video trimmer is used for trimming personal or properly licensed content only. Users are responsible for ensuring they have rights to all uploaded media. We do not take responsibility for any copyright infringement or unauthorized use of content.
How to Use Free Online MP4 trimmer
Follow these simple steps to trim videos online and trim your long videos with precision.
Upload Your Video
Select your video file by clicking the upload area or dragging and dropping. Supports MP4, WebM, MOV, and AVI formats. No file size limits, no upload to servers.

Set Trim Points
Use the timeline handles to select the start and end points of your desired segment. Drag the left handle to set the beginning and right handle to set the end. Watch the preview to ensure accuracy.
Choose Trim Mode
Select 'Keep Inward' to save only the portion between your trim points, or 'Keep Outward' to remove the portion between trim points and merge the remaining parts together.This is how you cut and trim video online with precision.
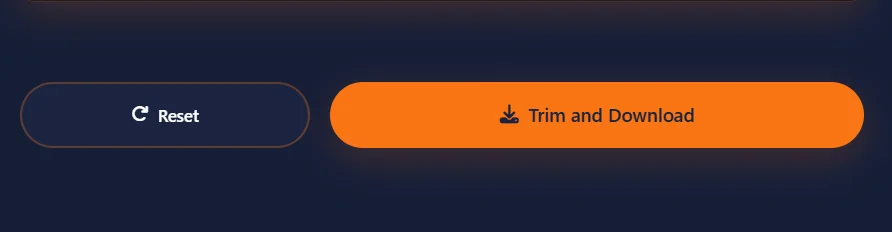
Preview & Export
Click 'Trim and Download' to process your video. The tool will trim your video locally in your browser and save it to your device. No watermark, no quality loss, completely free.
What is Video Trimming? Everything You Need to Know
Let us discuss about the complete evolution of video trimmer, From cutting physical film strips with scissors to real-time trimming.
So What Exactly is Video Trimming?
When you cut and trim video online, you remove unwanted parts from the beginning, middle, or end of your selected video. Our tool makes it easy to trim large video online free without any software installation.
Trimming videos is the most interesting and commonly used editing technique. I have been editing videos for over two years and trimming is the only thing I do more than anything else. The best part about trimming is that, you recorded a 30 minute Game play video, trim it to 5 minutes. Recorder a food vlog with boring intro? cut it down to the main content.
A best video trimmer doesn't re-encode your whole video, it just cut out the unwanted parts and stitch the remaining main parts together. Thats why good trimming tools are fast.
The History of Trimming — From Razor Blades to One Click
Back in the 1890s, trimming was not an easy method. If you wanted to trim a video, you literally took a scissor and cut the physical film. Then taped the main content ends together. Filmmakers like Georges Méliès found this method by cutting and rejoining films. They could also create special effects, but the issue is that trimming was permanent. No undo button. No preview. Just a cut, rejoin and hope you didn't mess up.
In 1924 Iwan Serrurier invented a device called " The Moviola ". A device that let editors to view film while trimming. For the first time editors could see what they are trimming before making the final cut. Hollywood filmmakers went crazy after this invention. This machine was used over half of the century.
After 50 years of the Moviola, some one really thought about the regular people. Adobe released Premiere 1.0 for Macintosh (Now commonly referred to as MAC). This was the first time when regular people could trim videos on a home computer by sitting at a couch. But the issue was that the software was painfully slow. A simple trim could take up to 30 minutes or more.
The invention of Final Cut Pro changed editors life. For the first time trimming was real-time. Just drag and drop your videos and see exactly what you were cutting in real-time. Professional editors switched to Final Cut Pro with no time because trimming became so intuitive.
In February 14, 2005, when YouTube appeared, Everyone suddenly felt to trim their videos. Because people started to upload everything, Concert videos, family videos, game clips, movies. With the passage of time, the demand of trimming started increasing and the online video trimmers started appearing. They were terrible at first. Low quality, Watermarks everywhere.
In today's Era, we have WebCodecs, MediaRecorder API's, and hardware in browsers. This means trimming happens instantly. No uploads, No watermark, No software installation, right in your browser. Just select the video, drag the handles to select the area, start processing, click download, and you are done. ClikDeo is the tool, I am talking about, to make trimming so fast and simple, right in your browser.
How Does Video Trimming Actually Work?
Let me explain the actual process in simple words without making this complex.
You just need to upload the video file. Your browser doesn't send the uploaded file anywhere. It just read the uploaded file from your computer. Think of it like writing words in a book. Words are there, not going anywhere from the pages.
Every video is made of individual pictures called frames. An average 1-minute video at 30 frames per seconds, has 1800 still images. When you drag the handles to select the trimming area, the tool is actually calculating which number of frames you want to keep in your video or not. Think of it like, you select frames from 0 to 45, keep them. From frames 45 to 1800, cut them.
This is the part where magic starts. The tool takes the frames you want to keep and copies these frames to a new video file and the same goes with audio files. After copying frames it stitches everything together. Have you ever used scissors to cut a strip of page and taped it back together? trimming is the same concept, but digital.
Once you trim large video online free. you can download the new trimmed video. And because trimming process happened on your computer, your original video is still safe. Nothing was upload to anywhere else, nothing was deleted. Just a new and shorter video ready to download and use.
Imagine two slices of bread. Trimming is like cutting the edges at both ends and keeping the soft middle slices. Or if you are keeping the outward, then keep the edges and throw away the middle part of the slices and stitch the edges from both end. That's trimming is, Keeping the parts you want and discarding the rest.
Keep Inward vs Keep Outward — What's the Difference?
This confuses a lot of people at first. Let me clear it up with real examples.
Keep Inward
What it does: You select a part with sliders and keep the part between the sliders. Removes everything else outside the sliders.
When to use it: Let's talk with an example. You recorded a 5-minute video but only the middle 2 minutes are good. In the beginning you were clearing you throat, while in the ending, your movements or actions were not stable. Use "Keep Inward" to keep only the good middle part.
Example: Your video is 0:00 to 05:00. You set start at 2:00 and end at 4:00. The final video will be 2 minutes long — from 2:00 to 4:00.
Keep Outward
What it does: Keep Outward means remove the part of a video between the sliders and keeps everything else.
When to use it: Imagine you recorded a video with boring middle part because of some reasons like device issues, or actors are not stable. Beginning is great, ending is great. But there's a middle part that adds nothing to your video. Use "Keep Outward" to cut out that boring part and stitch the good beginning and end together.
Example: Your video is 0:00 to 05:00. You set start at 2:00 and end at 4:00. The final video will be 5 minutes long — from 0:00 to 2:00, then immediately from 4:00 to 05:00. The middle section is removed.
Who Actually Uses Video Trimming? (Real Life Examples)
People use video trimmer every day for all kind of things. Here are some real life use cases listed below.
Trim your best moments/kills and main parts from 2-hour stream into a 30-seconds reel for TikTok, or YouTube shorts.
Cut out the parts where students are asking off-topic, illogical questions and logging issues. Keep the actual lesson.
Trim customers videos to remove unwanted pauses and filler words like "um" and "hmm" before posting your company videos to social media.
Cut down 3-hour long wedding ceremony video to 5-minute highlight reel for couples and remove unwanted actions.
Trim the intro and save it to use for later. Trim the parts where nothing is happening and get to the point.
What I've Learned After Trimming Thousands of Videos
After working as an editor or trimming thousands of videos like home videos to professional content, Some major points are,
- Always leave a tiny buffer. Don't trim your video exactly from the frame where someone start speaking. Leave a 0.5 second gap and trim. This gives more natural touch.
- Trim the silence, not the breath. Remove a part where someone taking breath before speaking. Sounds robotic.
- Watch it back at least twice. Trim weird jumps in audio or video and clear your video from unwanted points. but before posting make a complete scan one more time.
- Save your original file. Save your original file in another folder before starting trimming to be safe from any mishaps.
- For social media, shorter is almost always better. Cut long videos into 30 - 60 second parts, best for creating engaging content for social media platforms like TikTok, Instagram, YouTube etc.
Where is Video Trimming Headed Next?
I am working at this tool pretty closely. Here's what I think is coming in the next few years.
We have already starting seen AI-powered trimming tools. Imagine a tool where you just have to upload a video, no slider selection, tool will automatically cut silences, filler words and boring parts from your video. There will be no need to manual selection. Just upload and get a perfectly trimmed video. We are not there yet, but this time is coming faster and most people don't realize this.
If you have a decent computer or device then you can get 4k trimming now a days.
At ClikDeo, my goal is to make trimming so fast and smooth that you don't even think about it. Just upload, drag, download, done. No learning curve. No confusing settings.
So that's video trimming — from scissors and tape to dragging a slider in your browser. You don't need to understand any technical stuff to use ClikDeo's video trimmer. Simplest way to cut and trim video online is to upload your videos, drag the handles to select the point you want to keep or cut, and hit the download button. The rest will happen automatically. Still have any questions about how you can trim ? The " How It Works " section above has every steps for you.
Video trimmer Tips & Best Practices
Maximize the impact of your videos with our video trimmer professional editing tips and techniques
Plan Your Cuts
Before trimming, identify key moments in your video. Remove unnecessary pauses and repetitive content from your video to maintain viewer engagement.
Maintain Flow
Make sure that your trimmed video maintains a continuous flow. Avoid extra cuts that disrupt the narrative flow or visual continuity.
Optimize for Platforms
Different social platforms prefer ideal video lengths. Trim accordingly: 15-60 seconds for TikTok/Reels, 60 seconds for YouTube Shorts.
Keep Key Content
Preserve the most valuable information and emotional highlights from video while trimming. These are what keep audiences watching.
Audio Considerations
Pay attention to audio transitions when trimming. Sudden cuts in dialogue or music can be distracting to viewers.
Preview Before Exporting
Always make sure to watch your trimmed video from start to finish before exporting. This helps you find any strange transitions or cuts that don't look right.
How to Trim Large Video Online Free
To trim large video online free, simply upload your large file to trim videos online. The video trimmer processes everything locally in your browser.
Video Privacy & File Processing
Browser-based video editing tool with privacy considerations.
Video trimming is performed in your browser using WebAssembly and HTML5 technologies. Your videos are processed temporarily and are not stored on servers. Your uploaded content is cleared from browser memory after processing completes.
Local Browser Processing
All of our tools process videos locally in your browser.
Temporary Processing
Uploaded files are processed temporarily and cleared from active memory.
No Storage
We do not store user files or videos on any servers.
Our privacy approach
We focus on local browser video processing. Files are handled within your browser environment during editing sessions.