Get frames from video
Get frames from video online free with our frame extractor tool. Use our tool to Capture images from video in PNG, JPG, or WebP format with precise frame-by-frame navigation.
Please ensure you own the rights to the video you upload.
Grab frames from video
Or drag and drop your video here
Supported formats: MP4, WebM, MOV, AVI, MKV
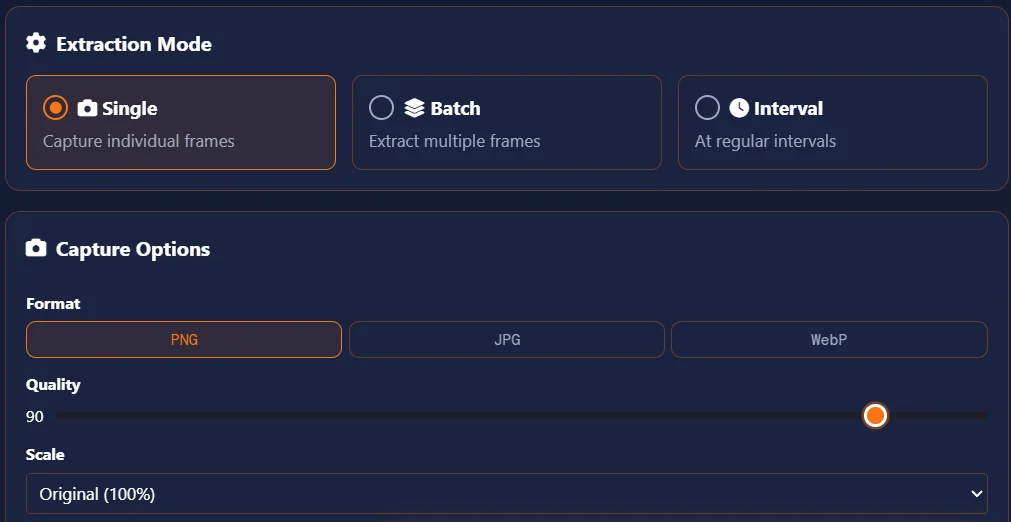
Extraction Mode
Upload a video to start
Frames
0Captured frames appear here
More Video Tools
Explore our powerful video editing tools to enhance your content creation process.
Video Trimmer
Trim unwanted sections from your videos with precision and user friendly interface.
Try NowVideo Merger
Merge multiple video clips into one seamless video with customizable settings and smooth transitions.
Try NowVideo Splitter
Upload your long videos and split them into smaller parts at specific timestamps.
Try NowInterval Countdown Editor
Add customizable timers and backgrounds to your videos engaging content for social media and presentations.
Try NowMulti-Reel Builder
Combine up to 3 videos in a single frame and create multi-video reels optimized for Instagram, TikTok and YouTube shorts.
Try NowShorts Creator
Convert your long videos into engaging short-form for YouTube shorts, Instagram reels and TikTok with our Shorts Creator tool.
Try NowAudio Extractor
Extract high-quality audio from your uploaded videos and save them in MP3 format for easy downloading and sharing.
Try NowCopyright Notice: Please make sure that you have the necessary rights and permissions to upload any videos you use with our tool. ClikDeo is designed for those who work with their own content or content they have permission to use. We do not support the unauthorized use of copyrighted material. Always respect intellectual property rights when using our services.
How to Get Frames from Video - 4 Simple Steps
Our tool allows you to easily export frame from video and download them. Follow these simple steps to capture frames from video instantly:
Upload Your Video
Select your videos files by clicking the " Start Extracting " button or selecting upload area. Our tool supports formats like MP4, WebM, MOV and AVI. Ensure you have rights to the content you upload.

Navigate to the Moment
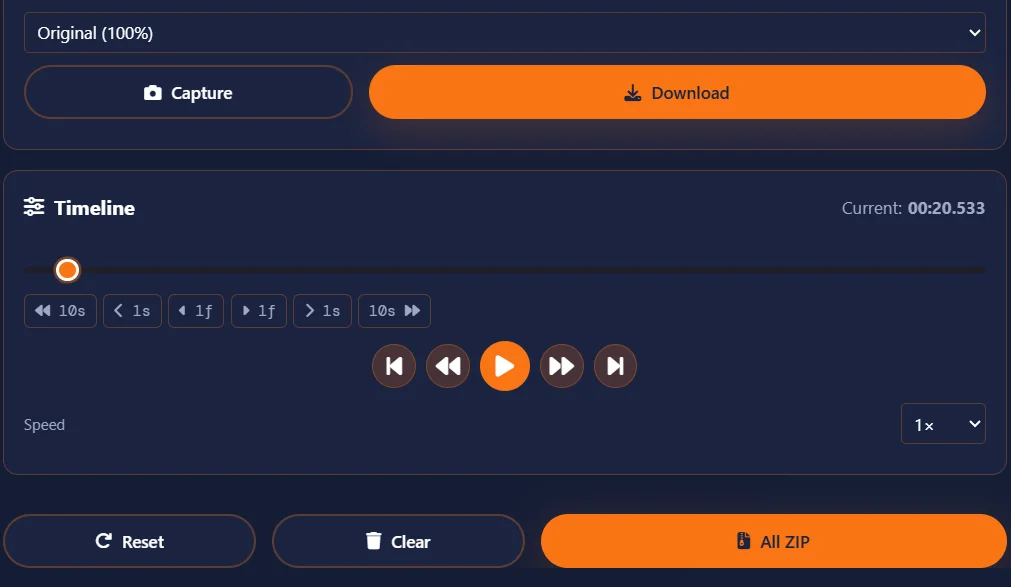
Use the timeline slider, step buttons (+1f/-1f for frame-by-frame), or keyboard shortcuts (arrow keys, C for capture) to find the exact frame you want to capture.

Choose Capture Options
Choose your preferred image format (PNG for lossless quality, JPG for smaller files, or WebP for balance). Adjust quality settings and scaling (100%, 75%, 50%, 25%) as needed. Use batch mode to capture images from video with single click.
Capture & Download
Click the 'Capture' button to export your frame instantly. For batch extraction, use Batch Mode or Interval Mode. Download individual frames or all frames as a ZIP file.
What is a Frame Extractor?
From film strips you could hold in your hands to clicking a button — the full story of grabbing still images from motion pictures
So What Exactly is a Frame Extractor?
Want to capture frames from video easily? A frame extractor is a simple tool use to pull individual still images out of a video file. Let me explain this with an example. Think of a video as a flipbook. When you flip this fast, you see motion. but each page of that flipbook is actually a separate picture. Those individual pictures are actually referred to as frames. A frame extractor grabs one of those pages and save it as image file, JPG, PNG, WebP, whatever you need.
I started using frame extractors years ago when I needed thumbnails for my YouTube videos. Watching the complete video, finding the best moment from the video and then taking a screenshot of that point was too hectic for me. Then I started using different frame extractor tools that let me grab frames instantly. This thing inspired me to create my own tool
There are a lot of reasons, someone need this tool. Content creators grab frames for youtube video thumbnails. Animators need this to study frame-by-frame movement. Teachers capture screenshots from educational videos. Photographers used frame extractor tool to pull still images from their video footage. Even regular people use it to save funny moments from videos as a picture.
The History of Frame Extraction — From Film Sprockets to Zero Clicks
George Eastman (the Kodak guy) invented celluloid film (Type of flexible plastic sheet invented in 1800s). After discovering celluloid film you could actually hold a "frame" in your hands. Each frame was printed on a long strip which was actually a physical photograph. If you wanted to extract a frame from that strip, you literally cut it out of the strip with scissors. No undo button, No preview. Just a permanent cut.
Optical printers were actually machines that project film frames onto fresh film stock. This machine allowed technicians to extract individual frames and re-photograph them but it was too expensive and required a whole room of equipment. Only some major studios could afford it.
In 1980s extracting a frame from a videotape was almost impossible. You'd need a special " Video Capture Card" that cost thousands of dollars. But there was a simple yet hectic solution. Most people pointed a camera at their TV screens and took a photo. But the issue was that the quality of images were terrible, grainy and blurry. VHS and Betamax became common in that era.
For the first time in history, Apple's QuickTime player introduced a "Copy Frame" feature. Which means a regular computer user could extract a frame from digital video file. But the only problem was that the video resolution was tiny, nearly 320x240 pixels. You had to pause the video perfectly at exact time, then click copy, then paste this into another program. No built-in save option.
With the excessive usage of YouTube, everyone needed thumbnails for their videos and this increased the demand of frame extraction tool. Some popular desktop software like VLC added frame capture. Online tools start appearing. But most of them required uploading users videos to servers, which meant waiting for long time , privacy concerns and even watermarks on your extracted frames.
Modern browsers don't need to upload or server processing, No watermark. Browsers can now decode video directly in JavaScript. Just select your video and the frame extractions process start right on your computer. That's what ClikDeo's frame extraction tool does. The frames are generated locally. And it takes milliseconds instead of minutes.
How Does a Frame Extractor Actually Work Under the Hood?
No any computer science degree required to extract frames from your videos. Let me explain this simply.
Most of the video files need to compress before frame extraction to save space. So, when you upload a video file, your browser reads the file and figures out how it's compressed. Same like a zipped folder. Then the browser has to "Unzip" the video before it can show you individual frames. All the process happens automatically in the background.
You just have to drag the slider or click the frame step buttons so that the tool understands the exact point in the video. In background, it's calculating which frame number corresponds to that time. For a 30fps video, frame 0 is 0 seconds, frame 30 is 1 second, frame 150 is 5 seconds. All the required math is done by browser automatically in the backend.
This is the key step of extracting a frame from a video. Every browser has a hidden feature called "Canvas". The frame extractor takes the current selected video frame and draws it onto the canvas. It is like the process of tracing a photo onto a blank sheet of paper.
The final step is to convert the canvas into an image file like PNG, JPG, or WebP. The browser compresses the image file according to your settings and save it as a downloadable file.
Single, Batch, and Interval Extraction — What's the Difference?
This tool gives you three ways to extract frames. Here's when to use each one.
Single Mode
What it does: Single mode means to pick one specific moment. The tool captures exactly one selected frame.
When to use it: You want to create a YouTube thumbnail for your next youtube project. A specific scene from a movie or a funny facial expression from a random video. Single mode is best for you to finish your task.
Example: You have a 06-minute video. At exactly 3 minutes and 25 seconds, there's a perfect shot. Single mode grabs that one frame from exact time.
Batch Mode
What it does: Batch mode means, set a start and end time, and the number of frames. The tool automatically captures the frames between those two points.
When to use it: You want to extract a section of video at regular intervals. For example you want 10 frames spread evenly across a 30-second clip to notice how scene changes.
Example: Start at 10:00, end at 20:00, count = 11 frames. You'll get frames at exact 10:00, 11:00, 12:00, all the way to 20:00.
Interval Mode
What it does: In this you set a time interval (like every 2 seconds) and a range. Then the tool start extracting a frame from every X seconds within that range.
When to use it: Use interval mode to get frames from a fixed time gap. For extracting frames from a long lecture to use as slides. For animation studies etc.
Example: Interval = 5 seconds. Start at 0:00, end at 1:00. You'll get frames at 0:00, 0:05, 0:10, 0:15, all the way to 1:00.
Where to use Frame Extractors? (Real Examples I've Seen)
People use frame extraction for all sorts of major projects. Let me mentioned some examples here.
Teachers and educators use their lectures or online lessons to extract key frames to use as slides. This process is faster than creating slides from the scratch.
Such artists extract frames from reference videos to study movement, lighting, and composition frame by frame. Consider it like having a flipbook of someone else's work.
Modern cameras shoot such high quality videos that people often use that videos to extract frames.
They record videos of every important game and after the game end or before any big tournament, extract frames from game footage to analyze player positioning, techniques and ball trajectory. Frame-by-frame analysis is common practice now.
Developers extract frames from movies or grab still images from game trailers to study visual effects, particle system, and animation timings.
Regular people use frame extractor tool to take photo from video save funny moment from a family videos as a picture. Or grab a frame from concert video they recorded. Regular people use this tool to save memory as a photo.
What I've Learned From Extracting Thousands of Video Frames
After building and using frame extractors, here's what actually works in real life.
- PNG for quality, JPG for speed, WebP for balance. Saving a frame as PNG gives you best quality but larger in size, JPG files are smaller but also loses some details. While WebP has the good quality and small size. I prefer PNG for thumbnail and WebP for everything else.
- Use frame-by-frame navigation for action shots. Use +1f/-1f buttons to capture the exact moment as a ball hits a bat or a dancer pose. One frame can make all the differences.
- Don't scale up — only scale down. For smaller file sizes, you can scale down to 50% or 70% to get better results but never scale above 100%, this will make in result of blurry frames.
- Preview your batch before extracting.If you are going to extract batch frames, check carefully first and the last timestamps. Nothing worse than extracting 50 or 60 frames and after extracting, you realized the timestamp you set was wrong.
- Keyboard shortcuts save so much time. To make frame extraction easy and smooth there are some shortcut keys like C to capture a frame. Arrow keys to move frame by frame. Space button to Play/Pause.
- Save your frames as you go. Don't wait until the processing complete or frames extracted completely. Browsers can crash, Tabs can close. So, download important frames immediately.
So that's video frame extraction — From cutting film strips with scissors to capturing frames with a single click in your browser How far we've come, right? You don't need to understand any of the technical details to use this tool. Just upload your video, find the moment you want, and click capture. The browser handles everything else automatically.
Do you still have any question about how this works? The "How It Works" section above walks you through every step. And if you're extracting frames for a specific project, try the batch and interval modes — they might save you more time than you expect.
Frame Extraction Tips & Best Practices
Follow these simple tips to get the best results when extracting frames from videos using our tool.
Choose the Right Format
Use PNG (screenshots, graphics) for lossless quality, JPG (photos) for smaller file sizes, and WebP for best compression.
Frame-Perfect Navigation
Use the +1f/-1f (Move forward or backward 1 frame) buttons or arrow keys to move frame by frame for precise capture of specific moments.
Keyboard Shortcuts
Press C to capture, Space to play/pause, ← → arrows for frame navigation. These shortcuts will Speed up your workflow
Batch Extraction Strategy
Use Interval Mode with 1-2 second gaps to generate YouTube thumbnails. For animation frames, use smaller intervals.
Scale Appropriately
Scaling is a key point to generate YouTube thumbnails and extracting frames from videos. Capture at original size for best quality, or scale down for thumbnails. Scaling up (200%) or too high may reduce quality.
Preview Before Batch
Make sure to preview the start and end points of the frames before batch extraction to ensure you're capturing the right segment.
How to Capture Photo from Video Perfectly
To capture photo from video perfectly, use frame-by-frame navigation. Both +1f/-1f buttons let you move one frame at a time to find the exact moment you want.
Video Privacy & Frame Processing
ClikDeo prioritizes your privacy and security. Here's how we handle video processing and frame extraction to ensure your data is safe and secure.
Our tool extract frames and generate youtube thumbnails from uploaded videos using HTML5 technologies. . Videos are not stored on any servers and are processed temporarily. Your uploaded content is cleared from browser memory after processing completes.
Local Browser Processing
ClikDeo algorithms run and process videos without uploading them to any servers.
Temporary Processing
Uploaded files are processed temporarily and cleared from active memory.
No Storage
We don't store or save any videos or extracted frames on servers.
Our Privacy Approach
We are committed to providing a secure and private experience for our users. We ensure that your content remains under your control at all times, and we do not have access to your videos or frames you process with our tool.